Today I had an annoying problem. We have some network restrictions at work, which mean that we cannot access a large number of sites nor download certain file types from the internet.
I had to run JVisualVM to fiddle a few MBeans in a running app. Nowadays, JVisualVM doesn't include the MBean browser, as it's included in the MBean tab plugin, which can be downloaded automatically... unless you don't have access to the internet (like all those guys working on super secret projects) or you have some other odd network restrictions.
To install the plugins manually, I had to try to download them from inside JVisualVM, as the error message shows the url from where it's trying to download it (I couldn't find anywhere a list of all the plugins and their download urls... it looks like they are distributed in the JVisualVM download area inside different releases).
After getting the files, I was able to ask someone to download them for me, and last I was able to import them in JVisualVM from Tools -> plugins (Downloaded tab). There had to "Add plugins" and once they were added, click on install.
Easy peasy... 1/2 hour gone in something that should have taken 1 minute :(.
Monday, 27 April 2015

Monday, 23 February 2015
Kaspersky - is it the worst security suite?
I recently upgraded to windows 8 after a series of problems I had with windows 7, which started when I uninstalled Kaspersky Internet Secuirty 2012 to upgrade to KIS 2014.
After the upgrade, most of the USB devices I connected were not recognized (luckily the wired mouse and keyboard did keep working). Quite a few people experienced this and there's some registry voodoo to fix this. Unfortunately the fix didn't work, and since I had to reinstall windows to fix this, I decided to upgrade to win 8.1.
After I installed Win8 I had yet another 2 issues. The first one with VMWare Workstation. For some reason, VMWS wasn't able to create a bridged connection (most of my VMs use this rather than NAT)... going through the Kaspersky Forums, a few people recommended in this case to uninstall KIS, create the network bridge, reinstall KIS. What a PITA, but it did work.
So now I have everything ready to start coding? Not really. Some encrypted connections kept dying on me (something as simple as a git pull from a tiny github repo would take 10 minutes and end up in a connection failure). Pausing the protection didn't help, so I went through the pain of uninstalling KIS, trying, reinstalling KIS just to prove that the problem was KIS (rather than a dodgy router). Finally I found that KIS 2015 has a feature to snoop on all encrypted connections and that was affecting the connection. So I had to go to settings -> additional -> Network -> uncheck Scan encrypted connections.
I'm quite sure that companies providing security suites are having more and more trouble to provide working, compatible software, as malware becomes more advanced, the number of consumer applications multiply, and the incompatibility matrix becomes a 1000000000x1000000000 minesweeper game with half of the cells with bombs which move around.
I think at some point I'm going to install Sophos UTM and see how that goes...
After the upgrade, most of the USB devices I connected were not recognized (luckily the wired mouse and keyboard did keep working). Quite a few people experienced this and there's some registry voodoo to fix this. Unfortunately the fix didn't work, and since I had to reinstall windows to fix this, I decided to upgrade to win 8.1.
After I installed Win8 I had yet another 2 issues. The first one with VMWare Workstation. For some reason, VMWS wasn't able to create a bridged connection (most of my VMs use this rather than NAT)... going through the Kaspersky Forums, a few people recommended in this case to uninstall KIS, create the network bridge, reinstall KIS. What a PITA, but it did work.
So now I have everything ready to start coding? Not really. Some encrypted connections kept dying on me (something as simple as a git pull from a tiny github repo would take 10 minutes and end up in a connection failure). Pausing the protection didn't help, so I went through the pain of uninstalling KIS, trying, reinstalling KIS just to prove that the problem was KIS (rather than a dodgy router). Finally I found that KIS 2015 has a feature to snoop on all encrypted connections and that was affecting the connection. So I had to go to settings -> additional -> Network -> uncheck Scan encrypted connections.
I'm quite sure that companies providing security suites are having more and more trouble to provide working, compatible software, as malware becomes more advanced, the number of consumer applications multiply, and the incompatibility matrix becomes a 1000000000x1000000000 minesweeper game with half of the cells with bombs which move around.
I think at some point I'm going to install Sophos UTM and see how that goes...
Sunday, 14 December 2014
Squid on cygwin "Unable to determine IP address from host name"
I recently started using vagrant+docker which meant that I started downloading a lot of RPMs, docker images and vagrant boxes.
To reduce the amount of time I spend waiting for packages to be downloaded, I set up squid on cygwin. The set up wasn't too complicated, but I got stuck with something. Squid reads /etc/resov.conf to find out which nameserver to use... and cygwin doesn't create (nor need) this file. This mean that I spend 1 hour trying to figure out why squid wasn't able to resolve names. This is part of the html Squid generated to report the error.
To reduce the amount of time I spend waiting for packages to be downloaded, I set up squid on cygwin. The set up wasn't too complicated, but I got stuck with something. Squid reads /etc/resov.conf to find out which nameserver to use... and cygwin doesn't create (nor need) this file. This mean that I spend 1 hour trying to figure out why squid wasn't able to resolve names. This is part of the html Squid generated to report the error.
The following error was encountered while trying to retrieve the URL: http://google.com/So if you want to run squid on cygwin, don't forget to create a /etc/resolv.conf file similar to the following one
Unable to determine IP address from host name "google.com"
search localI chose to use google's DNS (8.8.8.8) for the time being, but the best solution would be to run a script when I launch cygwin that creates/updates the resolv.conf file with my current DNS... but I have no idea at the moment how to get this data from windows.
nameserver 8.8.8.8
How to install synaptics drivers on windows 8/8.1
A while ago Synaptics started to ship drivers which are not digitally signed, which means that they cannot be installed on Windows 8/8.1 (and maybe 7 too).
And to add insult to injury, some laptop manufacturers (Hi Dell!) provide their own Synaptics drivers, with some trimmed down features, such as no 3 and 4 finger gestures (Hi again Dell!).
After spending quite a bit of time trying to figure out how to install the drivers, I found the answer in on of Microsoft forums. Check Jesperten answer, which I reproduce below. I had to do both parts, as the driver was not loaded after installing it.
Thanks a lot Jesperten!!
And to add insult to injury, some laptop manufacturers (Hi Dell!) provide their own Synaptics drivers, with some trimmed down features, such as no 3 and 4 finger gestures (Hi again Dell!).
After spending quite a bit of time trying to figure out how to install the drivers, I found the answer in on of Microsoft forums. Check Jesperten answer, which I reproduce below. I had to do both parts, as the driver was not loaded after installing it.
Here is a trick on how to install Synaptics Touchpad Driver v17.0.19 on Windows 8.1
    > WIN + I
    > Change PC Settings
    > Update and Recovery
    > Recovery
    > Under 'Advanced startup' click 'Restart Now'. Make sure to save your work first.
    > Select 'Troubleshoot'
    > Advanced Options
    > Startup Settings and click Restart
    > When it boots up, press 7 to Disable driver signature enforcement
    > Install Synaptics as you would normally do.
    > Restart
If the driver is not working properly and if the Synaptics settings does not appear under Mouse properties after completing the preceding steps, try the following:
    > Open device manager
    > Find the touchpad device (“PS/2 Compatible Mouse”)
    > Right click on the device and click “Update Driver Software”
    > Select “Browse my computer for driver software”
    > Select “Let me pick from a list of device drivers on my computer”
    > Uncheck the option “Show compatible hardware”
    > Under “Manufacturer”, scroll down to “Synaptics”
    > Under “Model”, the 17.0.19 driver should appear.
    > Select the driver and click next.
    > Click “Yes” to the “Update Driver Warning” pop-up.
    > Restart
Now, the Synaptics settings should appear under Mouse properties, from where it should be possible to change all the desired modifications to the touchpad like disabling Edge Swipe and invert two finger scroll directions.
This worked for me at least. I hope that others might find this trick helpful.
Thanks a lot Jesperten!!
Saturday, 13 December 2014
Remapping application and pause/break keys
I recently started using a laptop (Dell XPS 15) which doesn't have an menu / application key or a pause/break key. I use those two keys quite often: the application key because I'm too lazy to move my hand to perform a "right click" with a touchpad or mouse and the pause/break key for RDP sessions, to enter or exit full screen (I'm a shortcut junkie).
Using the amazing tool SharpKeys 3.5, I remapped
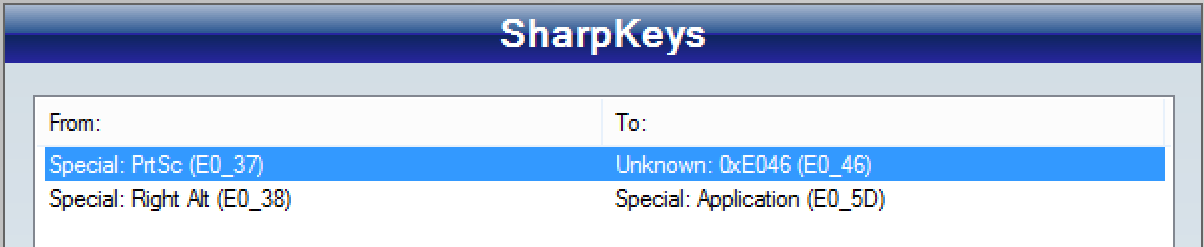
I wish the Function key on laptops would work as alt/ctrl and could be used to remap key.
Using the amazing tool SharpKeys 3.5, I remapped
- Right Alt Gr (code E0_38)=> Menu / Application key (code E0_5D)
- Print screen (code E0_37) => Break (code E0_46)
I wish the Function key on laptops would work as alt/ctrl and could be used to remap key.
Thursday, 11 December 2014
Enable core parking to safe precious battery life
This will allow windows to park cores dynamically, which (hopefully) translates into precious mWh saved.
Now you can go to Control Panel -> Power Options and edit the power profile. You'll find two new entries under Processor power management.

- Open regedit
- Search for the data 'unparked cores' (or just find the key below)
- Keep searching until you get to the following key (in CurrentControlSet).
- HKEY_LOCAL_MACHINE\SYSTEM\CurrentControlSet\Control\Power\PowerSettings\54533251-82be-4824-96c1-47b60b740d00\0cc5b647-c1df-4637-891a-dec35c318583
- Find the value "Attributes" and rename it to "Attributes.off" (this doesn't actually do anything apart from preventing windows from finding the real key... and it gives you a rollback path).
- Now search for the term 'unparked cores' and you should end up on the following key
- HKEY_LOCAL_MACHINE\SYSTEM\CurrentControlSet\Control\Power\PowerSettings\54533251-82be-4824-96c1-47b60b740d00\ea062031-0e34-4ff1-9b6d-eb1059334028
- Again, find the value "Attributes" and rename it to "Attributes.off"
- Reboot
Now you can go to Control Panel -> Power Options and edit the power profile. You'll find two new entries under Processor power management.
Saturday, 5 July 2014
Synaptics trackpad configuration and the dreaded "Windows Shell Common Dll has stopped working"
Recently, I've been repurposing my wife old laptop (a dell 1520 from 2007) after I was surprised how much faster it bacame after installing an SSD.
One of the things that I wanted to configure was the synaptics touchpad to have finger gestures (specially the 3 finger back and forward for the browser). After finding a suitable driver (as the lastest Synaptics drivers don't work on windows 8.1), I had to manually update the driver to the Synaptics one, because windows would keep setting it as a generic touchpad.
So finally, I had the driver installed, and I was ready to configure it... but when I tried to access the configuration screen I got the helpful message "Windows Shell Common Dll has stopped working".
After searching for about 1 hour, I found a few posts from people who got the same error when they tried to play a video... and the Synaptics tool does try to play a video to demonstrate each feature... a smoking gun.
Since my hacking skills are non-existent, I decided to take the low cost approach of removing all the wmv files from the folder where the driver was installed (c:\Program Files\Synaptics\SynTP\ in my case). After that I was able to access the configuration window.
It's a pitty that Synaptics doesn't have an option to configure right clicks in the same way as MacBooks (one finger pressed + one tap). It does have a right click with a 2 tap, but I think the other gesture is easier to use.
One of the things that I wanted to configure was the synaptics touchpad to have finger gestures (specially the 3 finger back and forward for the browser). After finding a suitable driver (as the lastest Synaptics drivers don't work on windows 8.1), I had to manually update the driver to the Synaptics one, because windows would keep setting it as a generic touchpad.
So finally, I had the driver installed, and I was ready to configure it... but when I tried to access the configuration screen I got the helpful message "Windows Shell Common Dll has stopped working".
 | |
| Mouse properties |
 |
| Windows Shell Common Dll has stopped working |
Since my hacking skills are non-existent, I decided to take the low cost approach of removing all the wmv files from the folder where the driver was installed (c:\Program Files\Synaptics\SynTP\ in my case). After that I was able to access the configuration window.
 | |
| Synaptics configuration window |
Tuesday, 6 August 2013
Error updating / installing cygwin
Cygwin recently started to provide different binaries for windows 32 and 64 bits (the previous version was 32 bit only). As part of this change, they've changed the layout of the update repositories, so if you have an old setup.exe binary, you might get one of the following errors when you select from which mirror to download the packages
 or the more cryptic
 The way to fix this is simple, just download one of the new flavours of setup_<arch>.exe from cygwin. If you download the 64 bit version I suggested you to install it in a different location or delete your previous version, but do not override a 32 bit version with a 64 bit version.
- Unable to get setup.ini from <ulr>
- Internal error: gcrypt library error 60 illegal tag.
Thursday, 1 November 2012
Windows 7 internal shutdown command
It looks like Windows 7 now has its own shutdown command. If you want to shutdown your computer with a timer, you can run:
/s tells the command to do a shutdown (no reboot) and /t is to add a time out. So the command above is equivalent to the linux command

shutdown.exe /s /t 3600
/s tells the command to do a shutdown (no reboot) and /t is to add a time out. So the command above is equivalent to the linux command
shutdown -h 3600If you suddenly don't want to shutdown (or reboot) your computer, you can abort the command with
shutdown.exe /a

Centos 6 hangs up at boot - say hi to selinux
Last night, I was updating some packages on a few Centos 6.2 VMs that I have in my home server when I found out that some commands hung (such as rpm), and that I couldn't open new login shells on any of the VMs.
I tried restarting one, just to see the boot process hang while starting bind/named. I restarted the VM again in single user mode, and disabled that service using chkconfig. Rebooted the VM, and it hung up on dhcpd, and later, after doing the same process, hung up on postfix.
At this point, I noticed a pattern: I obviously had broken a core library. Some of the packages that I had cherry picked for the update, were the standard C++ runtime libraries, and some other core components.
After searching the web for a while and fearing that I would need to reinstall all the VMs (luckily I have a golden VM template and I use puppet, so this wouldn't have been terrible, just very annoying), I found the release notes for Centos 6.3, which stated
After that, all of the VMs started properly without any issues. Unfortunately, the one that failed to start up is the one that has all the core network services (dns, dhcpd, ntp, etc). And further it failed with the message Kernel panic - not syncing - Attempted to kill init!. I particularly don't like KP. But I assumed that it was related to selinux issue.
I rebooted the VM with enforcing=0 and it did boot up, which pointed to an error on the selinux database. I run semodule -B to rebuild the selinux policy and I got an odd error saying that it couldn't find some files. The fix was quite simple
So last night I've learned:
I tried restarting one, just to see the boot process hang while starting bind/named. I restarted the VM again in single user mode, and disabled that service using chkconfig. Rebooted the VM, and it hung up on dhcpd, and later, after doing the same process, hung up on postfix.
At this point, I noticed a pattern: I obviously had broken a core library. Some of the packages that I had cherry picked for the update, were the standard C++ runtime libraries, and some other core components.
After searching the web for a while and fearing that I would need to reinstall all the VMs (luckily I have a golden VM template and I use puppet, so this wouldn't have been terrible, just very annoying), I found the release notes for Centos 6.3, which stated
If you update CentOS 6.2 to 6.3 with certain packages only, the system may hang upon reboot. For example, this happens if you apply only the security updates from CentOS 6.3. To fix this issue, boot the system with a "enforcing=0" kernel option and update selinux policy to 3.7.19-155.el6_3 (or later) available in the 6.3 updates repository.Phew, I had a solution. I restarted all the VMs with the boot option enforcing=0, and updated the following two package
- selinux-policy
- selinux-policy-targeted
After that, all of the VMs started properly without any issues. Unfortunately, the one that failed to start up is the one that has all the core network services (dns, dhcpd, ntp, etc). And further it failed with the message Kernel panic - not syncing - Attempted to kill init!. I particularly don't like KP. But I assumed that it was related to selinux issue.
I rebooted the VM with enforcing=0 and it did boot up, which pointed to an error on the selinux database. I run semodule -B to rebuild the selinux policy and I got an odd error saying that it couldn't find some files. The fix was quite simple
- Removed the policy packages with yum remove selinux-policy selinuc-policy-targeted
- Reinstalled the packages with yum install selinux-policy selinuc-policy-targeted
- And to be sure I run semodule -B again
So last night I've learned:
- Don't do any patching/upgrading half an hour before your target time to go to sleep.
- Respect selinux
- Always upgrade first selinux policy files, before upgrading any other OS library package
- Do a snapshot of the VMs before any big patching (schoolboy error)
Sunday, 30 September 2012
Cygwin: How to paste with a right click
For the last few weeks, I've been scratching my head because I could paste content into cygwin with a right click on my work computer, but I couldn't do it at home. And more annoyingly, I couldn't figure it out until a few minutes ago.
To enable paste with a right mouse click, follow these steps (written for dummies like me)
1) Open the cygwin options (aka preferences or settings)

2) Select mouse in the left menu, and select Paste under Right click action

And since the last few versions of cygwin supports windows resize, it has the same good features as putty :).
To enable paste with a right mouse click, follow these steps (written for dummies like me)
1) Open the cygwin options (aka preferences or settings)
2) Select mouse in the left menu, and select Paste under Right click action

And since the last few versions of cygwin supports windows resize, it has the same good features as putty :).
Sunday, 9 September 2012
Git error about missing ca-bundle.crt on Cygwin
If you get the following error:
$ git push -u origin master
error: error setting certificate verify locations:
  CAfile: /usr/ssl/certs/ca-bundle.crt
   [...]
when pushing, cloning, or any other operation that requires https access, the problem is that cygwin hasn't installed the ca-certificates package. Run the cygwin installer again, and add that package; after that git should start working.
Sunday, 5 February 2012
SELinux policy to run check_yum with sudo
A small update on the previous post. If you want to run check_yum with sudo you'll need to use the following policy file:
require {
type usr_t;
type boot_t;
type admin_home_t;
type rpm_var_lib_t;
type tmp_t;
type rpm_var_cache_t;
type nrpe_t;
type sudo_exec_t;
type http_port_t;
type rpm_exec_t;
class capability { sys_nice audit_write };
class tcp_socket name_connect;
class file { rename execute setattr read lock create ioctl execute_no_trans write getattr unlink open };
class netlink_audit_socket { write nlmsg_relay create read };
class lnk_file read;
class dir { search read write getattr remove_name open add_name };
}
#============= nrpe_t ==============
allow nrpe_t admin_home_t:dir search;
allow nrpe_t boot_t:dir { read getattr open };
allow nrpe_t http_port_t:tcp_socket name_connect;
allow nrpe_t rpm_exec_t:file { execute getattr read open ioctl execute_no_trans };
allow nrpe_t rpm_var_cache_t:dir { search getattr };
allow nrpe_t rpm_var_cache_t:dir { write read open add_name remove_name };
allow nrpe_t rpm_var_cache_t:file { rename create unlink setattr };
allow nrpe_t rpm_var_cache_t:file { write read getattr open lock };
allow nrpe_t rpm_var_lib_t:dir add_name;
allow nrpe_t rpm_var_lib_t:dir write;
allow nrpe_t rpm_var_lib_t:dir { getattr search };
allow nrpe_t rpm_var_lib_t:file create;
allow nrpe_t rpm_var_lib_t:file write;
allow nrpe_t rpm_var_lib_t:file { read lock getattr open };
allow nrpe_t self:capability { sys_nice audit_write };
allow nrpe_t self:netlink_audit_socket { write nlmsg_relay create read };
allow nrpe_t sudo_exec_t:file { read execute open execute_no_trans };
allow nrpe_t tmp_t:dir { read write add_name remove_name };
allow nrpe_t tmp_t:file { rename setattr read lock create write getattr unlink open };
allow nrpe_t usr_t:file { read getattr open };
allow nrpe_t usr_t:lnk_file read;
#-- End nagios_plugin_checkum.te
And you'll need to add something like the following to your /etc/sudoers file
#Defaults requiretty
#-- Start nagios_plugin_checkum.te
module nagios_plugin_checkyum 1.0.4;
require {
type usr_t;
type boot_t;
type admin_home_t;
type rpm_var_lib_t;
type tmp_t;
type rpm_var_cache_t;
type nrpe_t;
type sudo_exec_t;
type http_port_t;
type rpm_exec_t;
class capability { sys_nice audit_write };
class tcp_socket name_connect;
class file { rename execute setattr read lock create ioctl execute_no_trans write getattr unlink open };
class netlink_audit_socket { write nlmsg_relay create read };
class lnk_file read;
class dir { search read write getattr remove_name open add_name };
}
#============= nrpe_t ==============
allow nrpe_t admin_home_t:dir search;
allow nrpe_t boot_t:dir { read getattr open };
allow nrpe_t http_port_t:tcp_socket name_connect;
allow nrpe_t rpm_exec_t:file { execute getattr read open ioctl execute_no_trans };
allow nrpe_t rpm_var_cache_t:dir { search getattr };
allow nrpe_t rpm_var_cache_t:dir { write read open add_name remove_name };
allow nrpe_t rpm_var_cache_t:file { rename create unlink setattr };
allow nrpe_t rpm_var_cache_t:file { write read getattr open lock };
allow nrpe_t rpm_var_lib_t:dir add_name;
allow nrpe_t rpm_var_lib_t:dir write;
allow nrpe_t rpm_var_lib_t:dir { getattr search };
allow nrpe_t rpm_var_lib_t:file create;
allow nrpe_t rpm_var_lib_t:file write;
allow nrpe_t rpm_var_lib_t:file { read lock getattr open };
allow nrpe_t self:capability { sys_nice audit_write };
allow nrpe_t self:netlink_audit_socket { write nlmsg_relay create read };
allow nrpe_t sudo_exec_t:file { read execute open execute_no_trans };
allow nrpe_t tmp_t:dir { read write add_name remove_name };
allow nrpe_t tmp_t:file { rename setattr read lock create write getattr unlink open };
allow nrpe_t usr_t:file { read getattr open };
allow nrpe_t usr_t:lnk_file read;
#-- End nagios_plugin_checkum.te
And you'll need to add something like the following to your /etc/sudoers file
nagios ALL=(ALL) NOPASSWD: /usr/lib64/nagios/plugins/check_yum
And you need to comment out the following line in the sudores file, otherwise nrpe won't be able to parse the return
#Defaults requiretty
References
SELinux policy to run check_yum
The EPEL repo has lots of good (and SELinux friendy) plugins to run on remote hosts with NRPE. One that is missing is check_yum, which checks that the OS has the latest security patches.
To make that plugin work on CentOS 6, download the script from Nagios Exchange and apply a small change that is described in this comment.
When we try to run this script though nrpe in a SELinux enabled service, it will explode in a million colour pieces, as it tries to access some restricted resources. Here's the output when we try to run it.
[root@host plugins]# ./check_nrpe -H nrpehost.com -c check_yum
UNKNOWN: /usr/bin/yum cannot be found
To make it work, we need to create a selinux policy that will allow nrpe run yum.
Copy the following in a file called ~/nagios-plugin-checkyum.te
type nrpe_t;
type rpm_exec_t;
type rpm_var_lib_t;
class tcp_socket name_connect;
class lnk_file read;
class dir { search read write getattr remove_name open add_name };
class file { rename execute setattr read lock create ioctl execute_no_trans write getattr unlink open };
}
#============= nrpe_t ==============
allow nrpe_t boot_t:dir { read getattr open };
allow nrpe_t http_port_t:tcp_socket name_connect;
allow nrpe_t rpm_exec_t:file { execute getattr read open ioctl execute_no_trans };
allow nrpe_t rpm_var_lib_t:dir add_name;
allow nrpe_t rpm_var_lib_t:dir { getattr search };
allow nrpe_t rpm_var_lib_t:file create;
allow nrpe_t rpm_var_lib_t:file { read lock getattr open };
allow nrpe_t tmp_t:dir { read write add_name remove_name };
allow nrpe_t tmp_t:file { rename setattr read lock create write getattr unlink open };
allow nrpe_t usr_t:file { read getattr open };
allow nrpe_t usr_t:lnk_file read;
Some of the attributes make sense, for example, to allow nrpe to access an http port and run rpm. Since I'm not a SELinux expert I'm not sure it all the other permissions are ok, but at least, we're assigning this permissions only to the type nrpe_t, which shouldn't open a big hole in SELinux.
Now we need to build the policy as selinux requires binary package. To do so, run the following command on the same directory where you stored the previous file.
This will create a few files, but the one we're interested in is nagios-plugin-checkyum.pp, which is the selinux module. To install it run
After doing this, when we run the check, we get a response.
[root@host plugins]# ./check_nrpe -H nrpehost.com -c check_yum
YUM OK: 0 Security Updates Available. 5 Non-Security Updates Available
It is tricky to get the right policy for this plugin, as some of the selinux warnings when running in permissive mode marked with noaudit, so we need to disable no audit with semodule -DB, capture all the warnings, and then enable noaudit again with semodule -B.
Please share your experience whether this has worked for you.
To make that plugin work on CentOS 6, download the script from Nagios Exchange and apply a small change that is described in this comment.
When we try to run this script though nrpe in a SELinux enabled service, it will explode in a million colour pieces, as it tries to access some restricted resources. Here's the output when we try to run it.
[root@host plugins]# ./check_nrpe -H nrpehost.com -c check_yum
UNKNOWN: /usr/bin/yum cannot be found
To make it work, we need to create a selinux policy that will allow nrpe run yum.
Copy the following in a file called ~/nagios-plugin-checkyum.te
#-- Start ~/nagios-plugin-checkyum.te --
module nagios_plugin_checkyum 1.0.3;
module nagios_plugin_checkyum 1.0.3;
require {
type tmp_t;
type usr_t;
type boot_t;
type http_port_t;type tmp_t;
type usr_t;
type boot_t;
type nrpe_t;
type rpm_exec_t;
type rpm_var_lib_t;
class tcp_socket name_connect;
class lnk_file read;
class dir { search read write getattr remove_name open add_name };
class file { rename execute setattr read lock create ioctl execute_no_trans write getattr unlink open };
}
#============= nrpe_t ==============
allow nrpe_t boot_t:dir { read getattr open };
allow nrpe_t http_port_t:tcp_socket name_connect;
allow nrpe_t rpm_exec_t:file { execute getattr read open ioctl execute_no_trans };
allow nrpe_t rpm_var_lib_t:dir add_name;
allow nrpe_t rpm_var_lib_t:dir { getattr search };
allow nrpe_t rpm_var_lib_t:file create;
allow nrpe_t rpm_var_lib_t:file { read lock getattr open };
allow nrpe_t tmp_t:dir { read write add_name remove_name };
allow nrpe_t tmp_t:file { rename setattr read lock create write getattr unlink open };
allow nrpe_t usr_t:file { read getattr open };
allow nrpe_t usr_t:lnk_file read;
#-- End of ~/nagios-plugin-checkyum.te --
Some of the attributes make sense, for example, to allow nrpe to access an http port and run rpm. Since I'm not a SELinux expert I'm not sure it all the other permissions are ok, but at least, we're assigning this permissions only to the type nrpe_t, which shouldn't open a big hole in SELinux.
Now we need to build the policy as selinux requires binary package. To do so, run the following command on the same directory where you stored the previous file.
make -f /usr/share/selinux/devel/Makefile
This will create a few files, but the one we're interested in is nagios-plugin-checkyum.pp, which is the selinux module. To install it run
semodule -i nagios_plugin_checkyum.pp
After doing this, when we run the check, we get a response.
YUM OK: 0 Security Updates Available. 5 Non-Security Updates Available
It is tricky to get the right policy for this plugin, as some of the selinux warnings when running in permissive mode marked with noaudit, so we need to disable no audit with semodule -DB, capture all the warnings, and then enable noaudit again with semodule -B.
Please share your experience whether this has worked for you.
Saturday, 4 February 2012
Yum update - Metadata file does not match checksum
Today I was testing some nagios plugins to report missing security updates on Centos 6, and I started to get an error on one of the boxes when I tried to run "yum check-update". It looks like yum somehow got the wrong checksum from epel (maybe they were just updating the packages?).
This is the error I saw from yum,
Limiting package lists to security relevant ones
epel/updateinfo | 308 kB 00:01
http://mirror.bytemark.co.uk/fedora/epel/6/x86_64/repodata/updateinfo.xml.gz: [Errno -1] Metadata file does not match checksum
Trying other mirror.
epel/updateinfo | 308 kB 00:01
http://ftp.ntua.gr/pub/linux/fedora-epel/6/x86_64/repodata/updateinfo.xml.gz: [Errno -1] Metadata file does not match checksum
[...]
Trying to run the command resulted in the same error, so I had to clear all the metadata with the following command:
yum clean metadata dbcache expire-cache
After running that command yum was happy again.
This is the error I saw from yum,
Limiting package lists to security relevant ones
epel/updateinfo | 308 kB 00:01
http://mirror.bytemark.co.uk/fedora/epel/6/x86_64/repodata/updateinfo.xml.gz: [Errno -1] Metadata file does not match checksum
Trying other mirror.
epel/updateinfo | 308 kB 00:01
http://ftp.ntua.gr/pub/linux/fedora-epel/6/x86_64/repodata/updateinfo.xml.gz: [Errno -1] Metadata file does not match checksum
[...]
Trying to run the command resulted in the same error, so I had to clear all the metadata with the following command:
yum clean metadata dbcache expire-cache
After running that command yum was happy again.
Wednesday, 1 February 2012
Changing putty default configuration
Today I found out a simple way to change the default values in putty that doesn't involve fiddling with the registry.
To change the defaults:

Enjoy!
To change the defaults:
- Open putty and change any parameter you want as the new default.
- Go back to Session on the Category list.
- Enter Default Settings in Saved Sessions.
- Click save.
Enjoy!
Monday, 23 January 2012
Centos 6.2 graphical installation adds a few extra packages
Today I discovered that the minimal installation of Centos 6.2 installs a few extra packages if it's done in graphical mode. The graphical installation adds the package matahari, which also adds another 32 dependencies.
If you want to delete all these packages and services, run the following command
yum erase matahari-lib matahari-agent-lib matahari-broker matahari-host matahari-service matahari-sysconfig matahari-network matahari qpid-cpp-client qpid-cpp-client-ssl qpid-cpp-server-ssl qpid-cpp-server sigar polkit dbus qpid-qmf boost ConsoleKit eggdbus boost-filesystem boost-program-options boost-graph boost-date-time boost-serialization boost-test boost-thread boost-regex boost-wave boost-signals boost-iostreams boost-python ConsoleKit-libs libicu
Remember that this only applies to Centos 6.2.
If you want to delete all these packages and services, run the following command
yum erase matahari-lib matahari-agent-lib matahari-broker matahari-host matahari-service matahari-sysconfig matahari-network matahari qpid-cpp-client qpid-cpp-client-ssl qpid-cpp-server-ssl qpid-cpp-server sigar polkit dbus qpid-qmf boost ConsoleKit eggdbus boost-filesystem boost-program-options boost-graph boost-date-time boost-serialization boost-test boost-thread boost-regex boost-wave boost-signals boost-iostreams boost-python ConsoleKit-libs libicu
Remember that this only applies to Centos 6.2.
VMWare vCenter minimum permissions to deploy a VM
These are the minimum permissions that a user / group needs in order to
1. First create a user or group that requires these permissions in windows (vCenter uses the local windows or AD users).
2. Then login to vCenter as an administrator.
3. From the top navigation bar, go to Home -> Roles.
4. Right click on the Roles column and click on Add..
5. Create another role called Browse Datastore and set the following Privileges
7. Give the role a name, in this case we'll call it VMUser and set the following Privileges
8. To allow the user / group to connect to vSphere and see the VMs, go to Home > Inventory > Datastores ... and select the datastore where the VMs will be stored.
9. On the Permissions tab, right click and select Add Permission .... Add the user / group and select the role Browse Datastore from the dropdown. Then, click ok.
10. To allow the users deploy VMs, go to Home > Inventory > Hosts and Clusters and select the host or cluster where the user will be allowed to deploy vms.
11. On the Permissions tab, right click and select Add Permission .... Add the user / group and select the role Deploy from the dropdown. Then, click ok.
12. To allow users interact with the VMs, go to Home > Inventory > VMs and Templates and select a folder that contains the templates the user / group wants to deploy.
13. On the Permissions tab, right click and select Add Permission .... Add the user / group and select the role VMUser from the dropdown. Then, click ok.
Try this configuration by opening a new vSphere Vlient and login in as the new user. vSphere client should only show the VMs and templates in the folder that was selected on step 12 and allow a minimal number of operations on both VMs and templates.
To further secure this, it is good to allow the users to deploy VMs only to a resource pool that is memory and CPU constrained.
- Deploy a VM from a template using VMWare vCenter 5.
- Interact with the VM, without being able to change its configuration.
- Delete those VMs.
1. First create a user or group that requires these permissions in windows (vCenter uses the local windows or AD users).
2. Then login to vCenter as an administrator.
3. From the top navigation bar, go to Home -> Roles.
4. Right click on the Roles column and click on Add..
5. Create another role called Browse Datastore and set the following Privileges
- Datastore
- Allocate Space
- Browse Datastore
- Remove File
- Host
- Local operations
- Create virtual machine
- Delete virtual machine
- Resource
- Assign virtual machine to resource pool
- modify resource pool
7. Give the role a name, in this case we'll call it VMUser and set the following Privileges
- Global
- Cancel Task
- Host
- Local operation
- Create virtual machine
- Delete virtual machine
- Scheduled Task (check all)
- Virtual Machine
- Iteraction
- Answer question
- Configure CD media
- Configure floppy media
- Console interaction
- Device connection
- Power off
- Power on
- Reset
- Suspend
- VMWare tools install
- Inventory
- Create from existing
- Remove
- Provisioning
- Deploy template
- State (check all)
8. To allow the user / group to connect to vSphere and see the VMs, go to Home > Inventory > Datastores ... and select the datastore where the VMs will be stored.
9. On the Permissions tab, right click and select Add Permission .... Add the user / group and select the role Browse Datastore from the dropdown. Then, click ok.
10. To allow the users deploy VMs, go to Home > Inventory > Hosts and Clusters and select the host or cluster where the user will be allowed to deploy vms.
11. On the Permissions tab, right click and select Add Permission .... Add the user / group and select the role Deploy from the dropdown. Then, click ok.
12. To allow users interact with the VMs, go to Home > Inventory > VMs and Templates and select a folder that contains the templates the user / group wants to deploy.
13. On the Permissions tab, right click and select Add Permission .... Add the user / group and select the role VMUser from the dropdown. Then, click ok.
Try this configuration by opening a new vSphere Vlient and login in as the new user. vSphere client should only show the VMs and templates in the folder that was selected on step 12 and allow a minimal number of operations on both VMs and templates.
To further secure this, it is good to allow the users to deploy VMs only to a resource pool that is memory and CPU constrained.
Wednesday, 11 January 2012
The power of the personal wiki
In the last few days, I've been implementing a bit of the Getting Things Done process (or workflow) in order to be a bit more in control of everything that is going on in my life.
One of the things I've done is to create a personal wiki to use as a digital reference system and I've found that I'm adding so much information that I keep looking on the internet over and over again. The benefit is that I don't need to rely on google anymore and I can organize the information in whatever way I want.
Why is this important? Many times I've spent something between a few hours and a couple of days researching something (eg how to install certain software on the DLink DNS323), just to forget everything about that a few weeks later. This is not really a problem, until a few months later, whatever I did stops working and I need to remember (aka google furiously) what I did in order to revert it or fix it.
Here's where the personal wiki pays off as lots of the notes, links and sample scripts can be there as a reminder of what we've learned.
Of course there are lower tech solutions to this (eg use google docs or plain text files), but I like the wiki approach as it also allows to easily link, relate and search content.
One of the things I've done is to create a personal wiki to use as a digital reference system and I've found that I'm adding so much information that I keep looking on the internet over and over again. The benefit is that I don't need to rely on google anymore and I can organize the information in whatever way I want.
Why is this important? Many times I've spent something between a few hours and a couple of days researching something (eg how to install certain software on the DLink DNS323), just to forget everything about that a few weeks later. This is not really a problem, until a few months later, whatever I did stops working and I need to remember (aka google furiously) what I did in order to revert it or fix it.
Here's where the personal wiki pays off as lots of the notes, links and sample scripts can be there as a reminder of what we've learned.
Of course there are lower tech solutions to this (eg use google docs or plain text files), but I like the wiki approach as it also allows to easily link, relate and search content.
Subscribe to:
Posts (Atom)